> ## Documentation Index
> Fetch the complete documentation index at: https://docs.enterspeed.com/llms.txt
> Use this file to discover all available pages before exploring further.
# Continuous Deployment
Continuous Deployment enables you to push code changes to your different environments all the way to production without any manually steps.
When working with Enterspeed, your schemas are often as much part of the codebase as the code it-self. And because of that, you'll need to deploy the schemas together with the rest of the codebase. With the Enterspeed CLI, you can easily do that.
## CLI commands
Let's start by introducing the two Enterspeed CLI commands we will be using in this guide.
#### Extract deployment plan
```
es-cli deployment extract -e [source environment name]
```
This will extract a deployment plan from your source environment. The deployment plan is a `json` file containing the schema alias and version number for all schemas deployed to the environment.
```json title="Deployment plan example" theme={null}
{
"schemas": [
{
"schema": "category",
"version": 1
},
{
"schema": "contentPage",
"version": 1
},
{
"schema": "homePage",
"version": 1
},
{
"schema": "product",
"version": 2
}
]
}
```
#### Deploy deployment plan
```
es-cli deployment deploy -e [target environment name]
```
This will deploy the deployment plan to your target environment. For the deployment plan example above, the four schemas will be deployed to the target environment in the corresponding versions.
## Setting up Continuous deployment
For this example project, we have a CMS and a frontend application in the same repo. It's completely up to you want to structure your project.
This guide demonstrates how you can set up your CD pipeline using Azure pipelines, but the same concepts apply if you use Github Action, Jenkins, or any other CD tool.
### 1. Add the Enterspeed CLI and a pipeline file to the repo
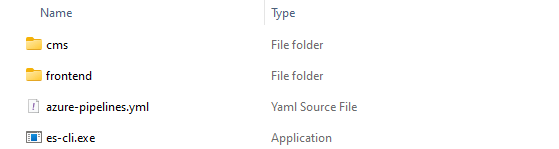
The first step is to [download the Enterspeed CLI](https://github.com/enterspeedhq/enterspeed-cli/releases) and add the `es-cli.exe` file as well as a `azure-pipeline.yml` file to the root of the repo.
### 2. Update pipeline file
Next step is to update the Azure pipeline file to the functionality that you want in the CD pipeline.
Below is an example of a pipeline file that automatically runs on every push to the `master` branch.
The pipeline consists of three stages, `Build`, `ReleaseToStage` and `ReleaseToProduction`.
#### `Build` stage
The first stage, the `Build` stage, is where we build the frontend and the CMS application.
*Note: In this pipeline example the `Build` stage is just adding a dummy step that prints out a text because it's not really the important part of the guide and because the `build` stage could vary a lot depending on the project you are building.*
```yml title="Build stage" theme={null}
variables:
- group: Enterspeed
trigger:
branches:
include:
- master
stages:
- stage: Build
displayName: Build
jobs:
- job: BuildFrontend
displayName: Build frontend
steps:
- task: CmdLine@2
displayName: Simulate frontend build
inputs:
script: 'echo Build frontend'
- job: BuildCms
displayName: Build cms
steps:
- task: CmdLine@2
displayName: Simulate cms build
inputs:
script: 'echo Build cms'
- stage: ReleaseToStage
...
- stage: ReleaseToProduction
...
```
#### `ReleaseToStage` stage
The second stage, the `ReleaseToStage`, is way more interesting. Here we use the two Enterspeed CLI commands we showed in the beginning of this guide.
With the first task, we extract the deployment plan from the `Development` environment.
The `&& type deploymentplan.json` at the end of the command will print out the content of the deployment plan in the log. This way you can always go back to a given release and see exactly which schemas were deployed as part of that release.
```
es-cli.exe deployment extract -e Development --apiKey $(apiKey) && type deploymentplan.json
```
In the second task we take the extracted deployment plan and deploy the schemas to the `Stage` environment.
```
es-cli.exe deployment deploy -e Stage --apiKey $(apiKey)
```
*Note: As part of this stage, you will probably also deploy your code for the frontend and the CMS application.*
```yml title="ReleaseToStage stage" theme={null}
variables:
- group: Enterspeed
trigger:
branches:
include:
- master
stages:
- stage: Build
...
- stage: ReleaseToStage
displayName: Release to stage
jobs:
- deployment: ReleaseToStage
displayName: Release to stage
environment: Stage
pool:
vmImage: windows-latest
strategy:
runOnce:
deploy:
steps:
- checkout: self
- task: CmdLine@2
displayName: "Extract Enterspeed deployment plan from Development"
inputs:
script: 'es-cli.exe deployment extract -e Development --apiKey $(apiKey) && type deploymentplan.json'
- task: CmdLine@2
displayName: "Deploys Enterspeed deployment plan to Stage"
inputs:
script: 'es-cli.exe deployment deploy -e Stage --apiKey $(apiKey)'
- stage: ReleaseToProduction
...
```
#### `ReleaseToProduction` stage
The third stage, the `ReleaseToProduction`, is almost an exact copy of the second stage. The only difference is that we are now extracting the deployment plan from the `Stage` environment and deploying it to the `Production` environment.
```yml title="ReleaseToProduction stage" theme={null}
variables:
- group: Enterspeed
trigger:
branches:
include:
- master
stages:
- stage: Build
...
- stage: ReleaseToStage
...
- stage: ReleaseToProduction
displayName: Release to production
jobs:
- deployment: ReleaseToProduction
displayName: Release to production
environment: Production
pool:
vmImage: windows-latest
strategy:
runOnce:
deploy:
steps:
- checkout: self
- task: CmdLine@2
displayName: "Extract Enterspeed deployment plan from Stage"
inputs:
script: 'es-cli.exe deployment extract -e Stage --apiKey $(apiKey) && type deploymentplan.json'
- task: CmdLine@2
displayName: "Deploys Enterspeed deployment plan to Production"
inputs:
script: 'es-cli.exe deployment deploy -e Production --apiKey $(apiKey)'
```
If you want to have more control and be 100% sure of which schemas and versions you deploy, you can skip the `extract` command from the CD pipeline and instead have the deployment plan as part of your source code in version control.
If you do that, the `deploy` command will deploy the deployment plan from your source code of the current branch you are deploying.
What the best option is depends on the project you are building and how you want your workflow to be.
### 3. Run the pipeline
Now it's time to run the pipeline and see how the schemas are deployed to the different environments.
#### Development
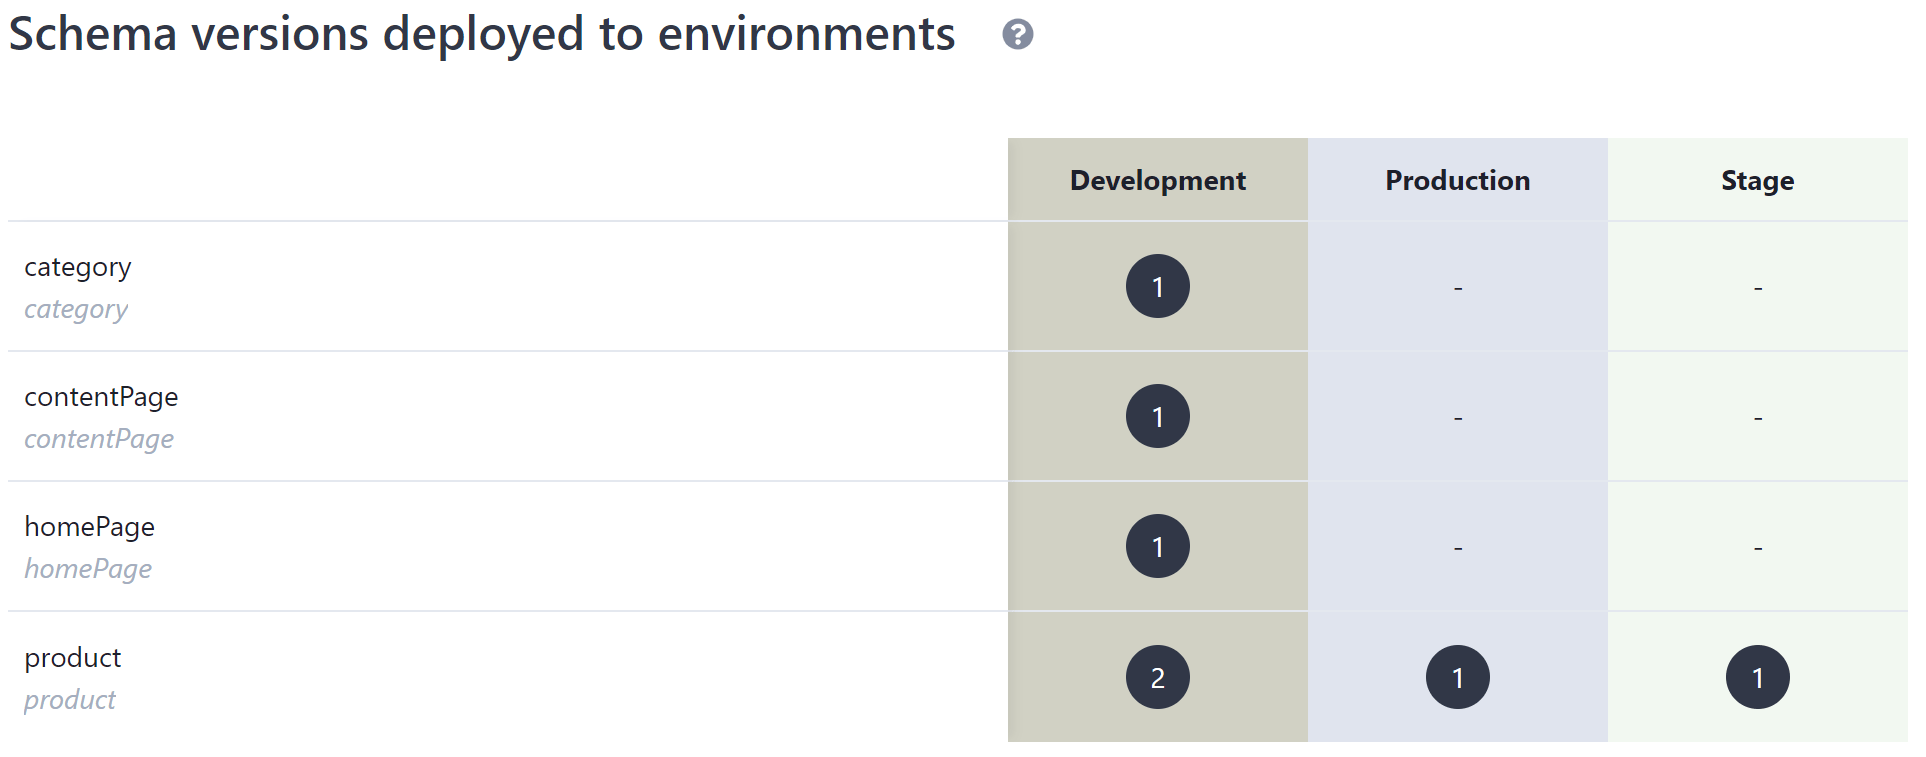
But before we do the first run, let's go to the `Versions` page in Enterspeed and see the state of our environments.
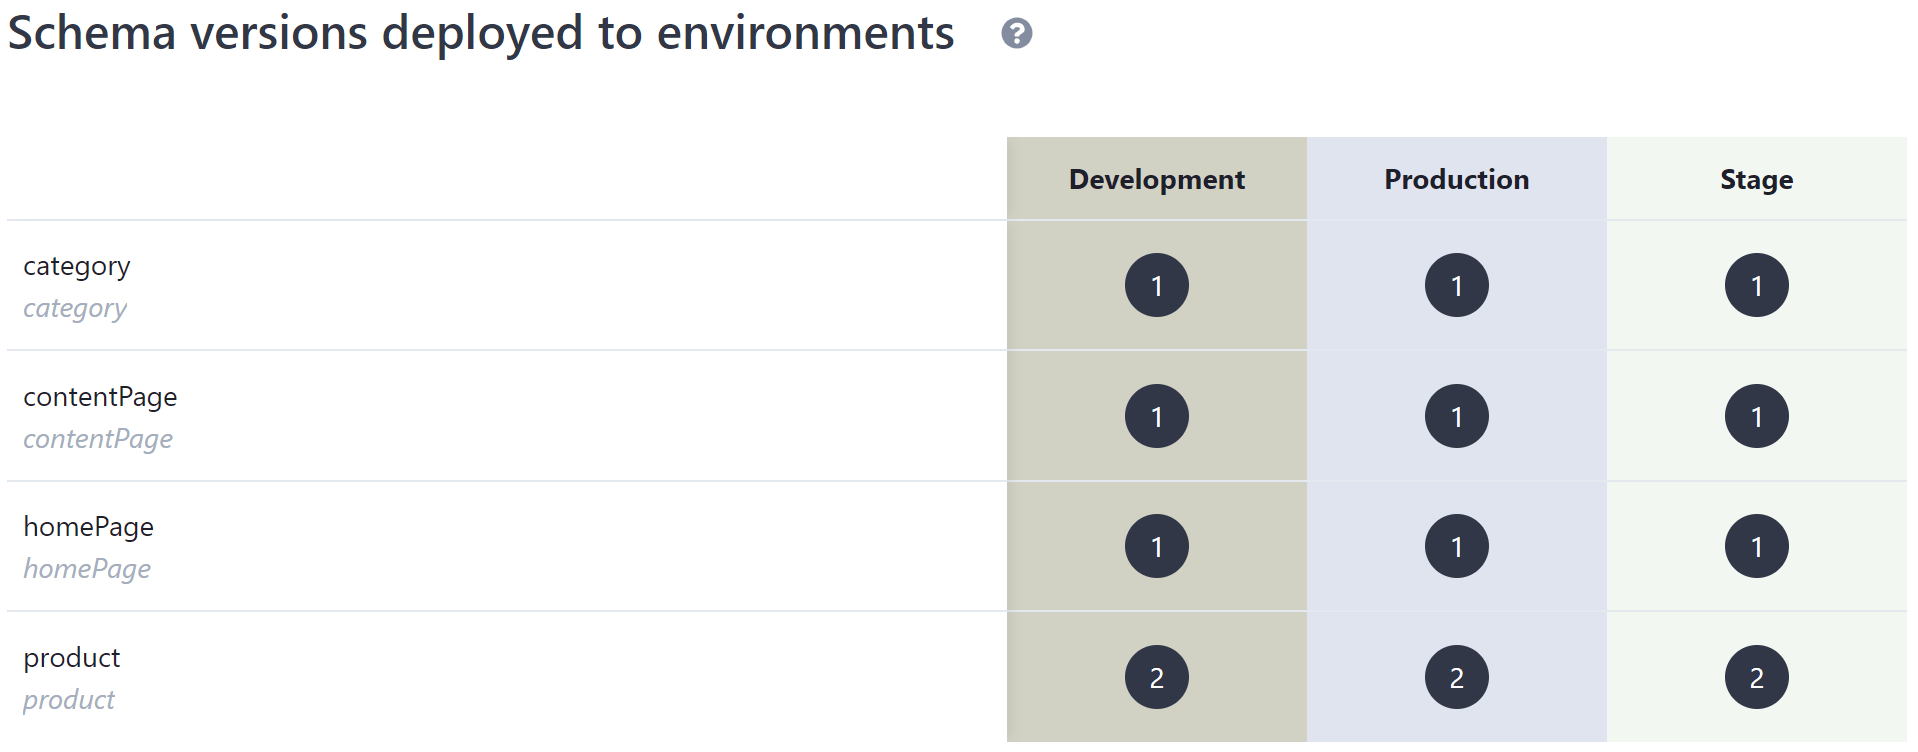
Here we can see that we have three schemas deployed in version 1 and one schema deployed in version 2 on the `Development` environment. After deployment to the `Stage` environment, we should get the same state as on the `Development` environment.
#### Stage
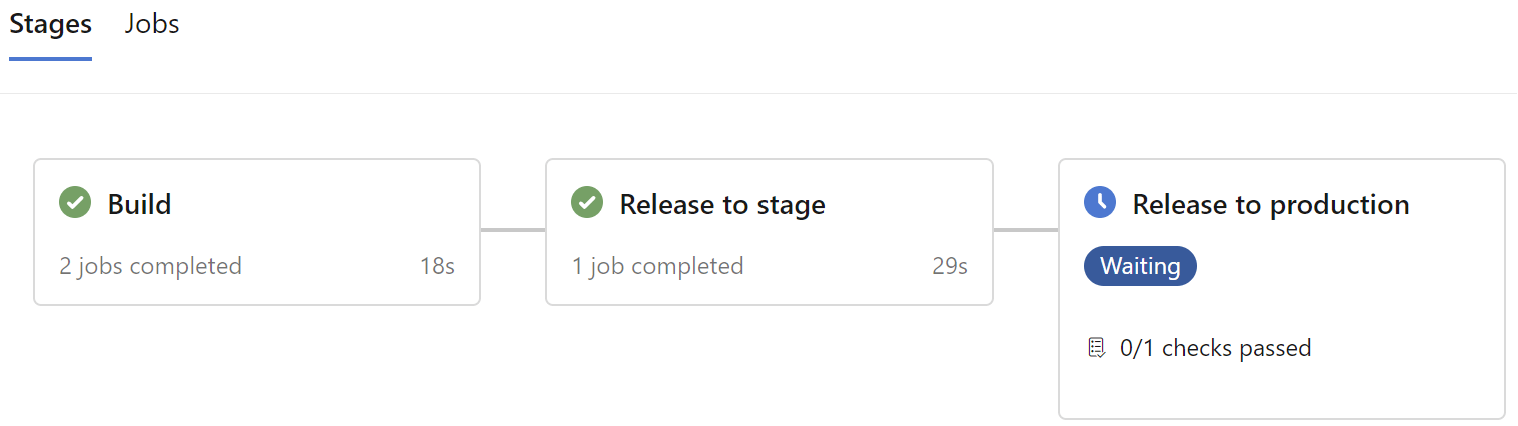
After pushing the changes to the `master` branch, the pipeline starts to deploy the changes and the schemas to the `Stage` environment.
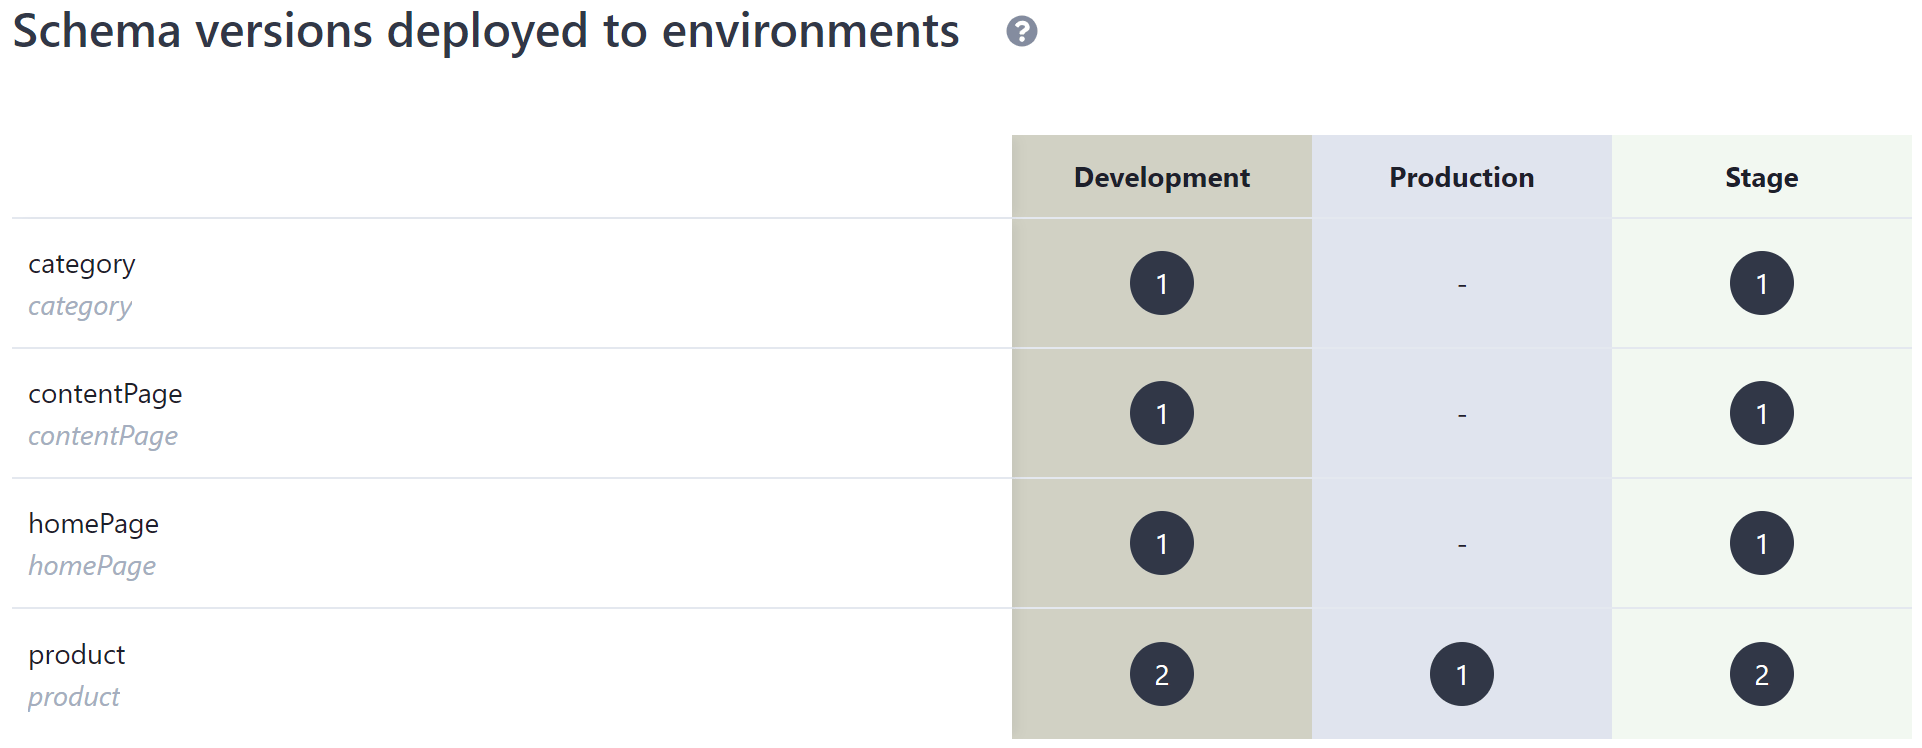
If we go back to the `Versions` page in Enterspeed, we can now see that the schemas from `Development` have automatically been deployed to `Stage`.
#### Production
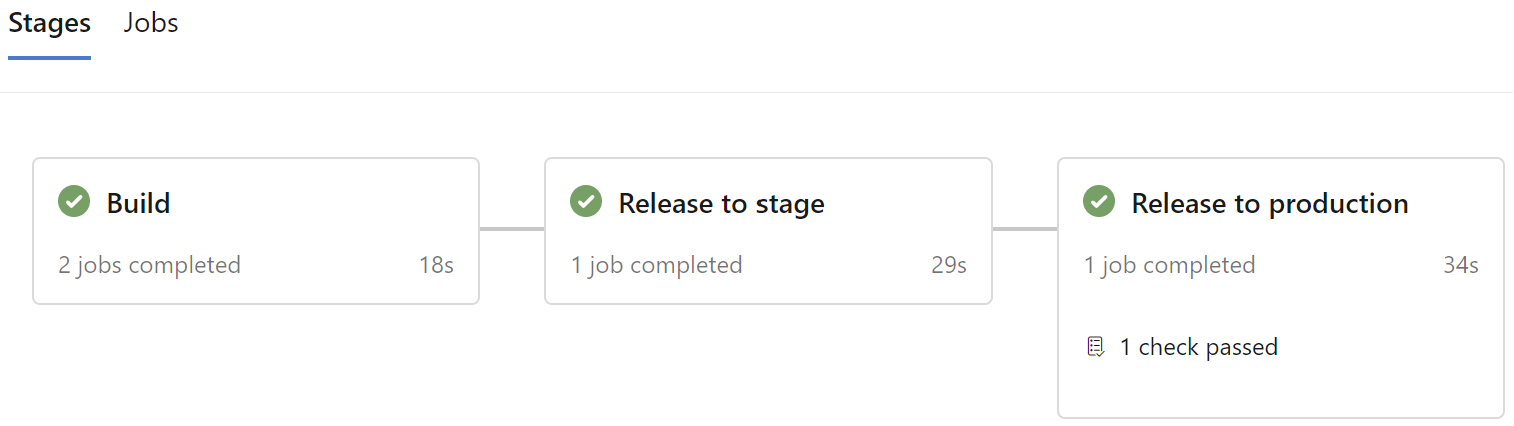
Let's continue the pipeline and take the release the last step out to `Production`.
If we go back to the `Versions` page in Enterspeed, we can now see that the schemas from `Stage` have automatically been deployed to `Production`.
### 4. Release completed
The CD pipeline has now fully completed and all our schemas (and code) have now been released to production without any manually steps in the release flow.
 ### 2. Update pipeline file
Next step is to update the Azure pipeline file to the functionality that you want in the CD pipeline.
Below is an example of a pipeline file that automatically runs on every push to the `master` branch.
The pipeline consists of three stages, `Build`, `ReleaseToStage` and `ReleaseToProduction`.
#### `Build` stage
The first stage, the `Build` stage, is where we build the frontend and the CMS application.
*Note: In this pipeline example the `Build` stage is just adding a dummy step that prints out a text because it's not really the important part of the guide and because the `build` stage could vary a lot depending on the project you are building.*
```yml title="Build stage" theme={null}
variables:
- group: Enterspeed
trigger:
branches:
include:
- master
stages:
- stage: Build
displayName: Build
jobs:
- job: BuildFrontend
displayName: Build frontend
steps:
- task: CmdLine@2
displayName: Simulate frontend build
inputs:
script: 'echo Build frontend'
- job: BuildCms
displayName: Build cms
steps:
- task: CmdLine@2
displayName: Simulate cms build
inputs:
script: 'echo Build cms'
- stage: ReleaseToStage
...
- stage: ReleaseToProduction
...
```
#### `ReleaseToStage` stage
The second stage, the `ReleaseToStage`, is way more interesting. Here we use the two Enterspeed CLI commands we showed in the beginning of this guide.
With the first task, we extract the deployment plan from the `Development` environment.
The `&& type deploymentplan.json` at the end of the command will print out the content of the deployment plan in the log. This way you can always go back to a given release and see exactly which schemas were deployed as part of that release.
```
es-cli.exe deployment extract -e Development --apiKey $(apiKey) && type deploymentplan.json
```
In the second task we take the extracted deployment plan and deploy the schemas to the `Stage` environment.
```
es-cli.exe deployment deploy -e Stage --apiKey $(apiKey)
```
*Note: As part of this stage, you will probably also deploy your code for the frontend and the CMS application.*
```yml title="ReleaseToStage stage" theme={null}
variables:
- group: Enterspeed
trigger:
branches:
include:
- master
stages:
- stage: Build
...
- stage: ReleaseToStage
displayName: Release to stage
jobs:
- deployment: ReleaseToStage
displayName: Release to stage
environment: Stage
pool:
vmImage: windows-latest
strategy:
runOnce:
deploy:
steps:
- checkout: self
- task: CmdLine@2
displayName: "Extract Enterspeed deployment plan from Development"
inputs:
script: 'es-cli.exe deployment extract -e Development --apiKey $(apiKey) && type deploymentplan.json'
- task: CmdLine@2
displayName: "Deploys Enterspeed deployment plan to Stage"
inputs:
script: 'es-cli.exe deployment deploy -e Stage --apiKey $(apiKey)'
- stage: ReleaseToProduction
...
```
#### `ReleaseToProduction` stage
The third stage, the `ReleaseToProduction`, is almost an exact copy of the second stage. The only difference is that we are now extracting the deployment plan from the `Stage` environment and deploying it to the `Production` environment.
```yml title="ReleaseToProduction stage" theme={null}
variables:
- group: Enterspeed
trigger:
branches:
include:
- master
stages:
- stage: Build
...
- stage: ReleaseToStage
...
- stage: ReleaseToProduction
displayName: Release to production
jobs:
- deployment: ReleaseToProduction
displayName: Release to production
environment: Production
pool:
vmImage: windows-latest
strategy:
runOnce:
deploy:
steps:
- checkout: self
- task: CmdLine@2
displayName: "Extract Enterspeed deployment plan from Stage"
inputs:
script: 'es-cli.exe deployment extract -e Stage --apiKey $(apiKey) && type deploymentplan.json'
- task: CmdLine@2
displayName: "Deploys Enterspeed deployment plan to Production"
inputs:
script: 'es-cli.exe deployment deploy -e Production --apiKey $(apiKey)'
```
### 2. Update pipeline file
Next step is to update the Azure pipeline file to the functionality that you want in the CD pipeline.
Below is an example of a pipeline file that automatically runs on every push to the `master` branch.
The pipeline consists of three stages, `Build`, `ReleaseToStage` and `ReleaseToProduction`.
#### `Build` stage
The first stage, the `Build` stage, is where we build the frontend and the CMS application.
*Note: In this pipeline example the `Build` stage is just adding a dummy step that prints out a text because it's not really the important part of the guide and because the `build` stage could vary a lot depending on the project you are building.*
```yml title="Build stage" theme={null}
variables:
- group: Enterspeed
trigger:
branches:
include:
- master
stages:
- stage: Build
displayName: Build
jobs:
- job: BuildFrontend
displayName: Build frontend
steps:
- task: CmdLine@2
displayName: Simulate frontend build
inputs:
script: 'echo Build frontend'
- job: BuildCms
displayName: Build cms
steps:
- task: CmdLine@2
displayName: Simulate cms build
inputs:
script: 'echo Build cms'
- stage: ReleaseToStage
...
- stage: ReleaseToProduction
...
```
#### `ReleaseToStage` stage
The second stage, the `ReleaseToStage`, is way more interesting. Here we use the two Enterspeed CLI commands we showed in the beginning of this guide.
With the first task, we extract the deployment plan from the `Development` environment.
The `&& type deploymentplan.json` at the end of the command will print out the content of the deployment plan in the log. This way you can always go back to a given release and see exactly which schemas were deployed as part of that release.
```
es-cli.exe deployment extract -e Development --apiKey $(apiKey) && type deploymentplan.json
```
In the second task we take the extracted deployment plan and deploy the schemas to the `Stage` environment.
```
es-cli.exe deployment deploy -e Stage --apiKey $(apiKey)
```
*Note: As part of this stage, you will probably also deploy your code for the frontend and the CMS application.*
```yml title="ReleaseToStage stage" theme={null}
variables:
- group: Enterspeed
trigger:
branches:
include:
- master
stages:
- stage: Build
...
- stage: ReleaseToStage
displayName: Release to stage
jobs:
- deployment: ReleaseToStage
displayName: Release to stage
environment: Stage
pool:
vmImage: windows-latest
strategy:
runOnce:
deploy:
steps:
- checkout: self
- task: CmdLine@2
displayName: "Extract Enterspeed deployment plan from Development"
inputs:
script: 'es-cli.exe deployment extract -e Development --apiKey $(apiKey) && type deploymentplan.json'
- task: CmdLine@2
displayName: "Deploys Enterspeed deployment plan to Stage"
inputs:
script: 'es-cli.exe deployment deploy -e Stage --apiKey $(apiKey)'
- stage: ReleaseToProduction
...
```
#### `ReleaseToProduction` stage
The third stage, the `ReleaseToProduction`, is almost an exact copy of the second stage. The only difference is that we are now extracting the deployment plan from the `Stage` environment and deploying it to the `Production` environment.
```yml title="ReleaseToProduction stage" theme={null}
variables:
- group: Enterspeed
trigger:
branches:
include:
- master
stages:
- stage: Build
...
- stage: ReleaseToStage
...
- stage: ReleaseToProduction
displayName: Release to production
jobs:
- deployment: ReleaseToProduction
displayName: Release to production
environment: Production
pool:
vmImage: windows-latest
strategy:
runOnce:
deploy:
steps:
- checkout: self
- task: CmdLine@2
displayName: "Extract Enterspeed deployment plan from Stage"
inputs:
script: 'es-cli.exe deployment extract -e Stage --apiKey $(apiKey) && type deploymentplan.json'
- task: CmdLine@2
displayName: "Deploys Enterspeed deployment plan to Production"
inputs:
script: 'es-cli.exe deployment deploy -e Production --apiKey $(apiKey)'
```
 #### Stage
After pushing the changes to the `master` branch, the pipeline starts to deploy the changes and the schemas to the `Stage` environment.
#### Stage
After pushing the changes to the `master` branch, the pipeline starts to deploy the changes and the schemas to the `Stage` environment.
 If we go back to the `Versions` page in Enterspeed, we can now see that the schemas from `Development` have automatically been deployed to `Stage`.
 #### Production
Let's continue the pipeline and take the release the last step out to `Production`.
#### Production
Let's continue the pipeline and take the release the last step out to `Production`.
 If we go back to the `Versions` page in Enterspeed, we can now see that the schemas from `Stage` have automatically been deployed to `Production`.
 ### 4. Release completed
The CD pipeline has now fully completed and all our schemas (and code) have now been released to production without any manually steps in the release flow.
### 4. Release completed
The CD pipeline has now fully completed and all our schemas (and code) have now been released to production without any manually steps in the release flow.